

Fallback-rooted multi-intent rules.Before you start
This walkthrough configures the Behavior layer of your Fini agent (the deterministic rules in Rulebook and the Reply Behavior gates around them). It assumes the other three layers your agent needs to be operational are already in place: Knowledge so the agent has something to fall back on when this rule doesn’t fire, Prompts so the Reply nodes inherit your tone and escalation rules, and Deployment so customers can actually reach the agent. If you’re starting from scratch, run Quickstart first, it walks you through all three in order. You’ll also need a handful of cancellation-specific things in place:What you’ll build
A subscription-cancellation flow that:- Identifies the customer on every message by looking up their email in your billing system, exposing their
customer_id,plan, and anis_vipflag to the agent. - Cancels the subscription when the customer asks to, by calling your billing API with the customer’s ID and reason.
- Orchestrates the conversation with a Rulebook tree that gates on intent, extracts the cancellation reason, calls the cancel Action, and replies with the confirmation details.
- Holds VIP cancellations for human review by posting an internal note instead of replying directly when the customer is on an Enterprise plan.
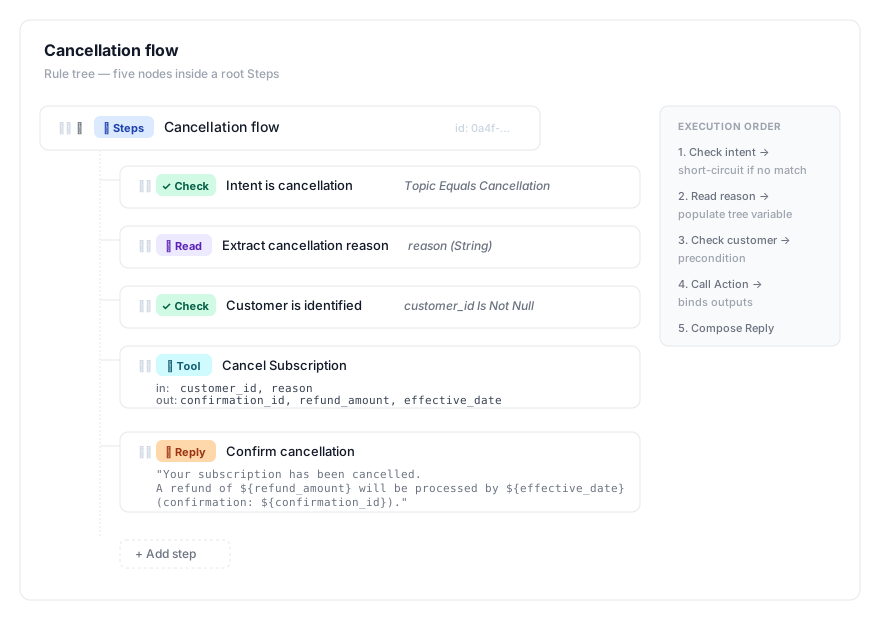
Cancel Subscription action with two typed inputs and binds three typed outputs as new tree variables. The Reply at the bottom composes the confirmation message, interpolating the Tool’s outputs into the final text.
The four pieces and where each is configured:
Step 1: Configure the User Attribute
The first thing the agent needs to know is who is this person?. User Attributes are Fini’s mechanism for pulling that context in. On every message, Fini calls your configured HTTP endpoint, parses the response, and exposes the named fields to the agent, so the agent always sees the currentplan, is_vip, and customer_id without you having to push updates to Fini.
Create the attribute
Customer Identity. Pick a Source:uiif your app passes the customer’s email through UI metadata.widgetif you sign the email into a JWT for the Fini widget.- The integration’s own name (e.g.,
zendesk,intercom,front,gorgias,hubspot,salesforce,livechat) if your traffic flows through a connected helpdesk, the helpdesk’s user identifier becomes the lookup key.
Declare the input field
email with Use as Input in API turned on. This tells Fini to pass email to the HTTP call as ${email}. The other two switches can stay off for the email itself, you don’t need to match rules on it or surface it to the LLM, you just need to use it to look up the customer.Add a Data Collection Step
- Name:
Lookup Customer - Method:
GET - URL:
https://api.yourbilling.com/customers?email=${email} - Headers:
{"x-api-key": "your-billing-api-key"}(per Fini’s API contract when calling your own endpoint; if you’re calling a third-party SaaS billing API like Stripe or Recurly, use their auth scheme instead, typically{"Authorization": "Bearer ..."}). - Save From Response:
{"customer_id": "id", "plan": "plan", "is_vip": "is_vip"}
Toggle the collected fields
customer_id stays out of LLM context, the agent should never quote an internal ID back to the customer. is_vip is a system flag for rules, not customer-facing.Downstream Actions that consume customer_id pick it up via the Tool node’s input binding in the Rulebook (covered in Step 3), not via a Use-as-Input-in-API toggle here.Attach to your agent
Customer Identity on, leave Chat and Email both selected (so the attribute fetches on both channels), and click Save.Verify the lookup
customer_id, plan, is_vip) with the right values. If anything’s off, fix it here, every downstream stage assumes this lookup works.What can go wrong at this stage
What can go wrong at this stage
- The Data Step returns 401 / 403: the secret token isn’t configured or doesn’t have the right permissions. Re-check the workspace secret value and the API’s auth requirements.
- The response mapping returns null fields: the JSON path on the right side of the mapping doesn’t match your API’s actual response shape. Run the API call directly (curl, Postman) and check the field names.
- The attribute works in test but not in production: the agent isn’t attached. Confirm the attribute is toggled on for the right agent under the agent picker.
Step 2: Configure the Action
The Attribute pulls customer state in; the Action pushes a change out. In this case, the change is cancel this customer’s subscription. Actions are workspace-level, you configure them once, and any rule in any agent can invoke them via a Tool node. Each Action declares an Input schema (the typed parameters it accepts) and an Output schema (the typed fields it returns). Those schemas are how the Rulebook validates Tool nodes at design time, type mismatches surface in the editor, not at runtime.Create the action
- Name:
Cancel Subscription - Description:
Cancels the customer's active subscription via the billing API. Returns confirmation id, refund amount, and effective date.
Define the Input schema
customer_id required means a Tool node referencing this Action won’t validate unless it binds something to customer_id. reason being optional lets the rule call the Action even when the customer didn’t volunteer one.Define the Output schema
refund_amount as number means downstream Checks can use numeric operators on it (e.g., refund_amount Greater Than 100). effective_date as string because most billing APIs return ISO date strings; downstream Replies can interpolate it as-is.Add the Data Step
- Step Name:
Cancel via Billing API - Method:
POST - URL:
https://api.yourbilling.com/v1/subscriptions/${customer_id}/cancel - Headers:
{"x-api-key": "your-billing-api-key"}(or your third-party billing system’s Bearer scheme). - Body:
{"reason": "${reason}"} - Save From Response:
{"confirmation_id": "confirmation_id", "refund_amount": "refund.amount", "effective_date": "effective_at"}
refund.amount (nested) but you want to expose it as a flat refund_amount to Rulebook.Test, then save
customer_id from your dev environment (one with an active test subscription you can safely cancel) and run the step. Confirm:- The HTTP call returns 200.
- All three output fields populate with the expected types.
- The response shape matches your declared Output schema.
What can go wrong at this stage
What can go wrong at this stage
- The test returns 404 / 422: the URL or body shape is wrong for your billing API. Compare against your API’s docs.
- The Play test won’t accept your customer_id: the Input schema is more strict than the test panel. Verify
customer_idis marked as a string, not a number. - Outputs don’t bind: the response mapping references a JSON path that doesn’t exist. Pull a real response from your API and update the right-hand-side paths.
Step 3: Configure the Rulebook rule
The Attribute brings customer context in; the Action pushes a change out; the Rulebook decides when the change happens and how the conversation flows around it. This is the orchestration layer. Each rule is a behavior tree that the LLM may invoke when the customer’s message matches the rule’s Description. Inside the tree, deterministic node types compose the work, Checks gate, Reads extract, Tools execute, Replies compose.Create a new rule
Cancellation flow.Write the Description carefully
“Use this rule when the customer wants to cancel their subscription. The query could look like: ‘cancel my subscription,’ ‘I want to close my account,’ ‘stop charging me,’ or ‘I’d like to terminate my plan.’”Tighten the example phrases over time to match how your customers actually phrase cancellation requests. Imagine you’re teaching a new teammate what triggers this rule, that’s the level of specificity to aim for.
Add the intent Check
Check as the node type. Configure:- Name: Intent is cancellation
- Condition group: in the field picker, expand Tag Groups and pick
Type of Issue(the default group) or your custom routing group (e.g.,Topic). OperatorEquals. ValueCancellation.
Cancellation. This protects against edge cases where the LLM routes overconfidently.Contains, not Equals); (3) a Cancellation tag defined, with its description teaching the model when to apply it; (4) the group assigned to your agent under the agent selector. The default Type of Issue group ships with a Cancellation-style tag and is the path of least resistance; create a custom Topic group only if you need different categories.Add the Read for the cancellation reason
Read. Configure:- Name: Extract cancellation reason
- Look at: Interaction History
- Find these details: field
reason, typeString - Instructions: “Extract the customer’s stated reason for cancelling. Examples include ‘too expensive,’ ‘not using it,’ ‘product not working,’ ‘switching to competitor.’ If no reason is given, return an empty string.”
reason that downstream nodes can reference as ${reason}.Add the customer_id Check
Check. Configure:- Name: Customer is identified
- Condition group: in the field picker, expand User Attributes → pick
customer_id. OperatorIs Not Null.
customer_id field that was exposed by the Customer Identity attribute in Step 1 (which is why it had Use in Rulebooks turned on). If the customer’s email lookup didn’t return a customer_id, they’re not in your billing system, or the API call failed silently, this Check short-circuits the rule cleanly instead of calling the cancel API with a null ID.Add the Tool node and bind its inputs
Tool. In the configuration panel:- Action: select
Cancel Subscriptionfrom the dropdown (the Action you created in Step 2). - Inputs: the panel shows the Action’s required inputs. For each one, pick where the value comes from:
customer_id→ bind tocustomer_id(from the User Attribute)reason→ bind toreason(from the upstream Read node)
confirmation_id, refund_amount, effective_date) automatically become tree variables available to nodes below this one.Add the Reply node
Reply. In the Instructions field, write:“Tell the customer their subscription has been cancelled. Mention that a refund of , and give them the confirmation ID $ for their records.”The
${variable} placeholders interpolate from the Tool’s outputs. The Reply node injects this as instructions into the agent’s reply-composition pass, the agent writes the final wording in its own voice, but the content (refund amount, dates, confirmation ID) comes from the bound variables.Assign to your agent
Customer Identity to in Step 1. A rule with no agents assigned never runs.Test before publishing
- Conversation Link, paste a URL to a real conversation from your Inbox. Use this when you want to verify the rule behaves correctly on conversations you’ve already seen.
- Custom JSON, paste a JSON object describing a synthetic conversation context. Use this for edge cases.
customer_id from the test you ran in Step 2’s Action, that’s a customer your billing API actually knows about. To test the VIP path you’ll configure in Step 4, set "is_vip": true instead and re-run. Click Run Test and walk the execution trace. A successful run looks like this: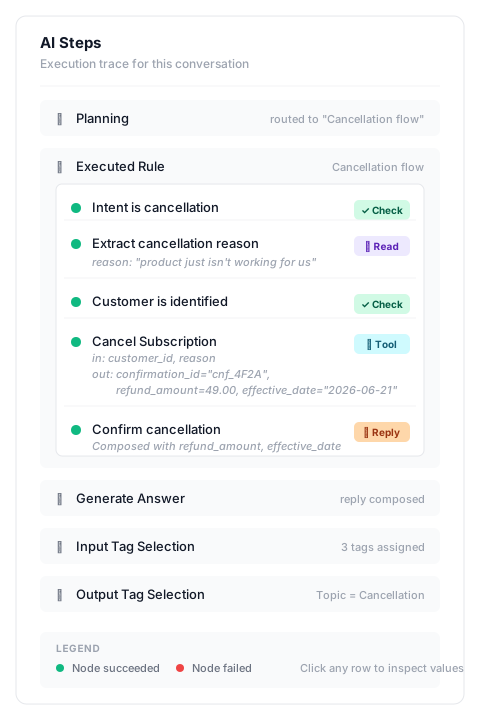
- The intent Check passes (green dot).
- The Read populates
reasonwith something like “product just isn’t working”. - The customer_id Check passes.
- The Tool fires with the expected inputs and returns three output fields with real values.
- The Reply interpolates the values correctly.
Publish
What can go wrong at this stage
What can go wrong at this stage
- The rule doesn’t fire on test conversations: the LLM didn’t route to your rule’s Description. Check the Planning section of the AI Steps trace to see which rule it picked (if any) and rewrite the Description with more example trigger phrases.
- The Read returns nothing: the extraction prompt isn’t specific enough. Edit the Read to say, e.g., “Extract the customer’s reason for cancellation, or return an empty string if no reason is given.”
- The customer_id Check fails: the User Attribute from Step 1 isn’t populated for this conversation. Verify the agent is attached to the attribute and the email lookup is returning customer_id.
- The Tool fails with auth errors: the workspace secret isn’t set or isn’t readable from this surface. Re-check the secret config.
Step 4: Configure the Reply Behavior safety net
You’ve now got a working cancellation flow. This step adds an optional safety override on top: for Enterprise customers (theis_vip flag from Step 1), the agent should draft the cancellation reply but post it as an internal note instead of sending it to the customer, so a human can review before it goes out.
This step is optional. The flow you built above works without it. But for high-stakes intents like cancellations, refunds, or account closures, especially with high-value customers, having Reply Behavior gate the final send is a common pattern in regulated industries.
Open the Internal Comment card
Add the two predicates
User Attributes → is_vipEqualsTrueTag Groups → Type of IssueEqualsCancellation(or your custom routing group, usingEqualsif Tag Selection is “Exactly one tag” orContainsif “Multiple tags can be selected”).
is_vip field you exposed in Step 1 (which is why it had Use in Rulebooks turned on). The second uses the same tag group the Rulebook Check reads, the LLM populates it after classifying the conversation. The three cards (No Reply, Internal Comment, Direct Reply) evaluate independently; the stricter behavior wins (No Reply > Internal Comment > Direct Reply).Enable and save
- Internal Comment lets the agent run the full Rulebook flow and draft a reply your team can review. The API call still happens. Useful when you want the work done but a human to vet the wording.
- No Reply would stop the agent from generating anything at all. The API call wouldn’t fire, the conversation would sit untouched, and you’d handle everything manually.
What can go wrong at this stage
What can go wrong at this stage
- The card doesn’t enable: there’s a predicate row with no value selected. Walk through and confirm every field, operator, and value is filled in.
- The Tag Group predicate doesn’t fire on test conversations: Tag Groups are populated by the LLM after it classifies the conversation. For brand-new test conversations, the tag may not exist yet. Use the AI Steps panel in the Inbox to check whether the Topic tag was applied.
- Internal Comment fires but No Reply was also expected: if you have a No Reply rule that also matches, it takes priority. No Reply > Internal Comment > Direct Reply.
Verify the flow end-to-end
With everything saved and published, send three test messages from a real conversation surface, the widget on your site, a test Zendesk ticket, an Intercom test conversation, whatever channel you’ve integrated your agent into. Use a test customer account whose email resolves through your billing API so theCustomer Identity attribute populates real values.
- Non-VIP, cancellation intent. Send “please cancel my subscription, the product isn’t working for us” from a test customer whose
is_vipis false. Within seconds, you should see a direct reply in the channel with the real refund amount interpolated from the Action’s output. - VIP, cancellation intent. Same message, but from a test customer whose
is_vipis true. The Rulebook still runs, the cancellation API call still fires, the reply is still drafted, but the reply posts as an internal note instead of a direct customer reply. A human teammate can review and follow up. - Non-cancellation intent. Send “how do I add a new card?” from any customer. The LLM doesn’t route to your
Cancellation flowrule (because the Description doesn’t match), the rule’s tree never runs, and the agent answers from its knowledge base instead. The intent Check inside your tree is a backstop for cases where the LLM does route here on a borderline message, it almost never triggers in normal operation.
customer_id Is Not Null fails, when the Tool errors, when the customer’s message routes away from this rule entirely, the agent answers from your Knowledge base. For this walkthrough to feel complete to customers, make sure you have Articles covering the fall-through paths: “We can’t process cancellations for closed accounts”, “We can’t find your account, please reach out from the registered email”, and the actual cancellation / refund policy text the agent will reference if the Tool fails mid-flow. Background AI watches conversations and proposes Articles for gaps it detects, check the Review queue weekly.- For tests 1 and 2: a green-dot trace through all five rule nodes, with the Tool node showing the real API output values.
- For test 3: the Planning section shows the LLM didn’t pick the Cancellation flow rule, and the Executed Rule section is empty, no rule ran, the agent answered from knowledge.
- Confirm before cancelling. Add a
Formnode before the Tool that requires explicit customer confirmation (a single “Confirm cancellation” button). The rule short-circuits cleanly on the first message if the customer hasn’t confirmed. - Idempotent cancel API. Pass a deterministic idempotency key (e.g.,
${customer_id}-${effective_date}) in the Action body so a duplicate Tool call returns the sameconfirmation_idwithout performing the cancellation twice. Most modern billing APIs support this header.
Lock it down with a regression test
Once the rule is live, add it to your Test Suite. Generate scenarios from a real cancellation transcript and bind one of Fini’s six pre-built judges, Tool use correctness is the natural fit for cancellation (did the Cancel Subscription Action fire on the right input?), pair it with Goal resolution if you want to also grade whether the customer ended up with their stated outcome. Scenarios are simulated multi-turn conversations, so the expected outcome should describe the arc (“agent acknowledges, calls the cancel action with the customer_id, confirms with the refund amount”) rather than verbatim wording. Re-run the set every time you change the Description, the Read instructions, or the Action’s Data Step. After a week in production, open Analytics → Overview and find the row forCancellation (or your routing intent) in the Category breakdown table. The row shows volume, AI resolve rate, and escalated rate for that intent specifically; click the row to spot-check conversations. If the escalated rate is climbing while the rule keeps firing, the issue is in the Reply, the Action, or downstream Reply Behavior, open those conversations in the Inbox and walk the AI Steps trace for each one.
What to vary
Once the basic flow is in place, common adaptations:- Add a Form for structured reason collection. Replace the Read node with a Form node that gives the customer a dropdown of cancellation reasons plus a free-text “other” field. Read works when the customer volunteers the reason in their message; Form is better when you need structured, required input you can analyze later (e.g., reporting on cancellation reasons). The form’s submitted values become tree variables the Tool can reference. See Rulebook → A worked example: address change with Form.
- Chain multiple Tools. Add a
Verify Refund EligibilityTool beforeCancel Subscription, gate the cancel Tool with a Check on the eligibility output, and handle the denial path with a Reply explaining why. See Rulebook → Chaining Tools. - Different VIP definition. Replace the
is_vip Equals Truepredicate with a tier check onplan(e.g.,plan Equals Enterprise), or layer multiple conditions for tiered escalation. - Stay silent for VIPs instead of drafting. Switch the Reply Behavior rule from Internal Comment to No Reply if you want the agent to not engage at all for VIPs, leaving the conversation entirely to humans.
- Add graceful recovery. Wrap the cancellation Tool in a Fallback whose second child is a Reply explaining what happened, so a failed API call gives the customer a useful response rather than escalating silently.
Troubleshooting
Stages where this walkthrough commonly gets stuck, ordered by likelihood.Everything works in test but not in production
Everything works in test but not in production
The Rulebook rule doesn't fire on cancellation messages
The Rulebook rule doesn't fire on cancellation messages
The customer_id Check fails on every conversation
The customer_id Check fails on every conversation
customer_id for this agent. Three things to check:- The attribute is toggled on for the correct agent under Configuration → Attributes with that agent selected in the picker.
- The email used in the lookup matches what’s actually being passed (UI metadata vs widget JWT vs integration user ID, depending on your Source).
- The API endpoint is returning a
customer_idvalue, not null or undefined. Test the Data Collection Step’s lookup with a known-good email.
The Tool node fails with auth errors at runtime
The Tool node fails with auth errors at runtime
BILLING_API_TOKEN isn’t configured as a workspace secret, or the secret value is wrong, or the secret isn’t accessible from the Actions Data Step (separate from Attributes). Verify under workspace settings → Secrets that the value exists and matches what your API expects. The same ${SECRET_NAME} syntax works for both Attributes and Actions, but they reference the same workspace-level secret store, there’s no per-feature scoping.The Read node returns an empty string for reason
The Read node returns an empty string for reason
- The customer genuinely didn’t say why, “please cancel” is a valid cancellation message with no reason. The Read’s instructions should allow this: “Extract the customer’s reason if given; return an empty string otherwise.”
- The extraction prompt is too narrow. If the customer wrote “this product just isn’t working for us anymore”, the LLM might not classify that as a “reason.” Broaden the instructions with examples of what counts.
The Tool succeeds but downstream Reply doesn't interpolate the values
The Tool succeeds but downstream Reply doesn't interpolate the values
- Typos:
${refundAmount}vs${refund_amount}, variable names are case-sensitive and exact. - Schema mismatch: the response mapping in Step 2 didn’t expose the field, so it’s not available as a tree variable. Re-verify the mapping.
- Path errors:
refund.amountin the response wasn’t flattened torefund_amountin the mapping. Check Step 2’s response mapping.
The Reply Behavior rule fires when it shouldn't (or doesn't when it should)
The Reply Behavior rule fires when it shouldn't (or doesn't when it should)
- A higher-priority card matched first. No Reply beats Internal Comment beats Direct Reply. If you have a No Reply rule that also matches (e.g., human agent assigned), it overrides Internal Comment. Audit your No Reply conditions.
- The Topic tag isn’t populated yet. Tag Groups are populated after classification. On brand-new test conversations, the Topic tag may not exist, so the predicate evaluates to false. Open AI Steps → Output Tag Selection to confirm the tag was applied.
The cancellation API call fires but I want to roll it back
The cancellation API call fires but I want to roll it back
- Use Reply Behavior to gate destructive Actions (Step 4’s pattern) so a human reviews before the customer sees the confirmation.
- Add an “Are you sure?” Form before the Tool node, requiring an explicit confirmation step.
Related
Rulebook
Inbox
Analytics
Reply Behavior
Attributes
Actions
Test Suite
Tags
Topic tag group the Check at the top of the tree references.